こんにちは。YOSHITAKA(@YOSHITA19704216)です。

初心者
Android Studio&Kotlinでは文字の大きさやサイズの指定をまとめることができるんですか?

よしたか
学んだことをアウトプットしていきます。
この記事を読むことで
- 文字の大きさやサイズの指定をまとめるファイル「dimens.xml」の使い方がわかります。
Contents
文字の大きさやサイズの指定をまとめるファイル「dimens.xml」の使い方
対象者
大前提
- Android Studio&Kotlin初学者を対象にしています。
ファイルの配置場所
ファイルの場所は以下になります。
res/values/dimens.xml

レイアウトにボタンを設定する「activity_main.xml」
activity_main.xmlのファイルの中を確認します。

サンプルは次のようにしておきました。
<resources>
    <!-- Default screen margins, per the Android Design guidelines. -->
    <dimen name="activity_horizontal_margin">16dp</dimen>
    <dimen name="activity_vertical_margin">16dp</dimen>

    <!--   ここから追加 単位はdpやspで設定する-->
    <dimen name="textSize">50sp</dimen>
</resources>
色のファイル指定「dimens.xml」
dimens.xmlに余白部分の大きさと名称を指定します。
nameに使いやすい名称を設定します。
タグの中に数値と単位を追加します。

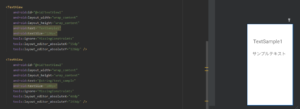
以下のように上が直書きで下が「dimens.xml」を通して、記入したものになります。
<TextView
    android:id="@+id/textView1"
    android:layout_width="wrap_content"
    android:layout_height="wrap_content"
    android:text="TextSample1"
    android:textSize="120px"
    tools:ignore="MissingConstraints"
    tools:layout_editor_absoluteX="50dp"
    tools:layout_editor_absoluteY="126dp" />

<TextView
    android:id="@+id/textView2"
    android:layout_width="wrap_content"
    android:layout_height="wrap_content"
    android:text="TextSample2"
    android:textSize="@dimen/textSize"
    tools:ignore="MissingConstraints"
    tools:layout_editor_absoluteX="50dp"
    tools:layout_editor_absoluteY="243dp" />
まとめ
今回は文字の大きさやサイズの指定をまとめるファイル「dimens.xml」の使い方についてお伝えしました。
※プログラミングは習得中ですので、参考程度に記事を読んでください。